Preamble
The L-Log Plugin has been developed to support the normalization of Leica L-Log footage across Video Editing (NLE) and Visual Effects (VFX) applications that use the OpenFX Standard. The Plugin performs technical transforms based on the L-Log reference documentation that was briefly published by Leica. Given the lack of publicly available documentation, the Characteristic Curve is plotted below for future reference.

As a further reference, L-Log Middle Gray is correctly exposed at 44% IRE.
Prerequisites
The Leica L-Log Plugin has been developed using the OpenFX standard.
It includes GPU acceleration using OpenCL 1.2, CUDA 10.2 and Metal as well as CPU Multi-threading support.
The Plugin is separated into a standard build and a Legacy build.
The standard build uses the OpenFX v1.4 API for current host applications, whereas the Legacy instance uses OpenFX v1.2 for support across older host applications such as DaVinci Resolve 14.
Both releases are supported on 64-bit instances of Linux, Windows and MacOS.
The Legacy instance is supported from Mac OSX 10.11 onwards and includes CUDA support, whilst the standard instance is supported from Mac OSX 10.13 onwards and includes native Apple Silicon support.
Installation
The installer files must be extracted from the zip file. The respective installer will manage installation to the required locations.
The LLog.ofx.bundle or LLog_Legacy.ofx.bundle package MUST be installed to the designated OFX Plugin folder for the relevant operating system.
Windows
The Windows Installer will place the OFX Plugin to the following folder:
C:\Program Files\Common Files\OFX\Plugins\
MacOS
The MacOS Package Installer will place the OFX Plugin to the following folder:
/Library/OFX/Plugins/
Note that some Mac Users may experience issues with Gatekeeper Security. A security prompt may appear and prevent the plugin from being installed or used. In this scenario, the OFX Plugin will need to be allowed through the Mac Security settings under System Preferences > Security & Privacy > General.
Linux
The OFX Installer will need to be executed through a command terminal. The run command may look like:
./LLog_OFX_v1.0_Linux.run
The OFX Plugin will be copied to the following folder:
/usr/OFX/Plugins/
Uninstall
The Plugin can be uninstalled on Windows systems via the “Add or remove programs” feature.
For the MacOS and Linux operating systems, simply delete the LLog.ofx.bundle package from the designated folder of your Operating System.
For MacOS, this package is located under:
/Library/OFX/Plugins/
For Linux, this package is located under:
/usr/OFX/Plugins/
Usage
The Leica L-Log Plugin has been developed to work across numerous workflows, including ACES. The plugin has been developed with some internal smarts, allowing default parameters to be altered based on the host application. The sections below will outline the parameters available and sample workflows.
Usage Parameters
Exposure Correction
The Exposure Correction Parameter allows for exposure adjustment in Exposure Values (EV) from -8 to +8.
The values can be manipulated using the slider or by inputting the EV directly in the designated field. Source footage that is either over-exposed or under-exposed can be corrected this way.
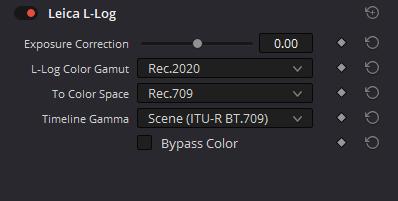
L-Log Color Gamut
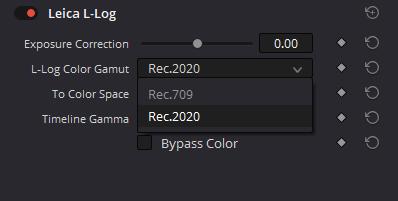
This setting allows for the desired Color Gamut to be selected based on the Leica camera type. This is normally Rec.2020, with the exception of the Leica SL (Typ 601) from firmware v3.8 onwards, which uses Rec.709 color primaries.
The default option is Rec.2020.
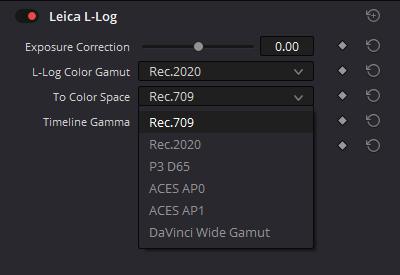
To Color Space
This setting will transform the source to the desired color space, normally aligning with the Timeline Color Space in the host application.
The Color Space Options are:
- ACES AP0
- ACES AP1
- P3 (D65)
- Rec. 709 (D65)
- BT. 2020 (D65)
- DaVinci Wide Gamut
The Default selection is dependent on the Host application.
Note: When the To Gamma is set to ACEScc or ACEScct, the To Color Space is automatically locked to ACES AP0 and the plugin internally converts to AP0, then down to AP1. ACES AP1 is the color space associated with ACEScc, ACEScct and ACEScg, whilst ACES AP0 consists of the ACES 2065-1 color primaries.
Timeline Gamma
This setting will convert the source to the desired Gamma, normally aligning with the Timeline Gamma settings in the host application.
The Gamma Options are:
- Linear
- ACEScc
- ACEScct
- Scene (ITU-R BT.709)
- Gamma 2.2
- Gamma 2.4
- Gamma 2.6
- DaVinci Intermediate
- sRGB
The default Gamma setting is dependent on the host application.

Bypass Color
This setting allows all color parameters to be bypassed so that only the Gamma is affected. If checked, the L-Log Color Gamut and To Color Space options are disabled.
Example Workflows
DaVinci Resolve
ACEScc or ACEScct
Using the Leica L-Log plugin inside an ACES workflow is fairly straightforward. Any source media must firstly be set to have No Input Transform. The Leica L-Log plugin can then be added into the Node structure of the designated clip. The To Gamma must be set to the required ACEScc(t) parameter as per the project settings. The To Color Space will automatically change to ACES AP0 as a result.
DaVinci YRGB & YRGB Color Managed
When editing in DaVinci YRGB Color Managed workflows, the source media’s Input Color Space must be set to Bypass or Same as Timeline depending on the version. The To Color Space and To Gamma must also match the settings of the project appropriately. In a Color Managed workflow, these parameters will be dependent on the project Timeline color settings. In a Non-Color Managed workflow, these will be dependent on the Output color settings.
In Resolve 16 and below, the default timeline option is normally Rec.709 for Color Space and Gamma 2.4 for Gamma. In Resolve 17 and above, the default gamma option will vary between Gamma 2.4 and Scene, depending on whether the installation is completely new or updated from earlier versions.
There are additional caveats to be aware of when using Resolve 17 and above. In Color Managed workflows, Resolve will now set Tone and Gamut mapping on input and output settings by default – these are referred to as Input DRT and Output DRT. Enabling DRT may have adverse impacts to the scene before it is normalized. To avoid issues with tone and gamut mapping when using SDR presets, it is recommended to select the Custom preset and to disable the Input DRT by selecting None. One may also choose to select the the DaVinci Wide Gamut preset first before changing to Custom and output to an SDR format such as Rec.709. This preset will expand the project to a wider Color Gamut and Dynamic Range, similar to an ACES workflow. Regardless, it is recommended that Input DRT be explicitly disabled across all projects.
Assimilate Scratch
When using the Leica L-Log plugin inside Assimilate Scratch, the source media must be set to either a Rec.2020 or a Rec.709 Color Space depending on the color gamut of the recorded media. The Gamma of the source media must also be set to Linear. Within the Leica L-Log plugin, the To Gamma selection must be set to Linear and the Bypass Color checkbox must also be ticked. These parameters allow Assimilate to perform the source Color Space conversion whilst the plugin will manage the L-Log to Linear conversion. By default, the plugin automatically sets these required parameters when first loaded inside Assimilate Scratch.
VFX Applications
When using the Leica L-Log plugin inside VFX applications such as Fusion Studio, Nuke and Natron, the To Color Space option automatically defaults to ACES AP1 (also referred to as ACEScg). The To Gamma setting also defaults to Linear in order to cater for the required Visual Effects workflows.